
Buying a used saddle can feel like striking gold… or stepping on a financial landmine.
New saddles routinely cost $1,000 to $3,000 (and far more for certain brands). So it makes sense that many riders — especially budget-conscious equestrians — turn to the used market.
But here’s the truth: a cheap saddle with hidden damage is not a bargain. It’s an expensive mistake.
If you know exactly what to look for in a used saddle, you can save hundreds (sometimes thousands) of dollars while still getting a high-quality, comfortable piece of tack.
This guide will walk you step-by-step through how to inspect a used saddle before you buy — whether it’s English or Western — so you can purchase with confidence.

Why Buying a Used Saddle Can Be Smart (If You Do It Right)
There are three major benefits to buying used:
- Saddles depreciate quickly once purchased new.
- High-quality brands hold up for decades when cared for properly.
- You can often afford a better brand used than you could new.
However…
A broken tree, dry-rotted billets, or poor saddle fit can cost more to fix than the saddle is worth.
The goal is not to buy the cheapest saddle you can find.
The goal is to buy the most structurally sound saddle within your budget that fits you and your horse.
Let’s start with the most important part.
1. Check the Saddle Tree First (Non-Negotiable)
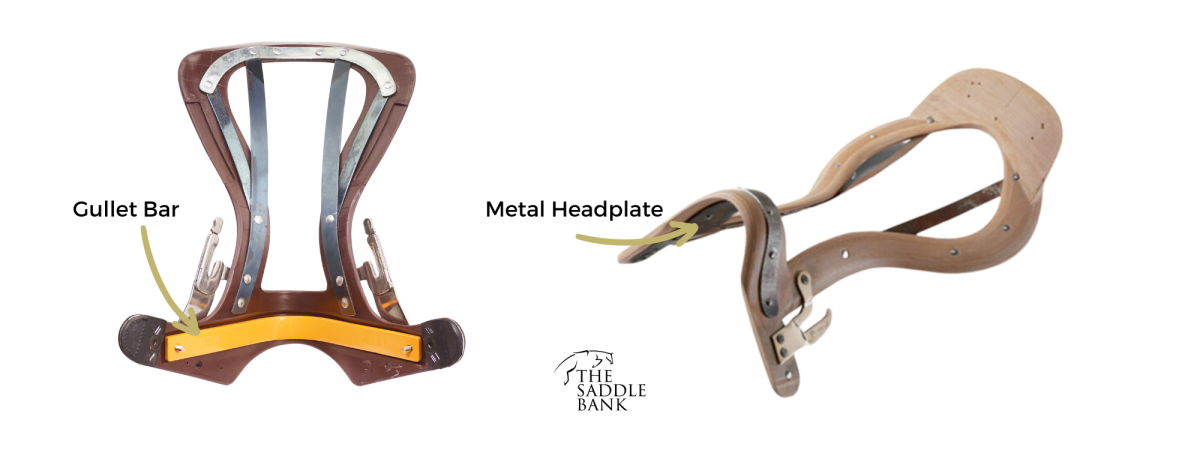
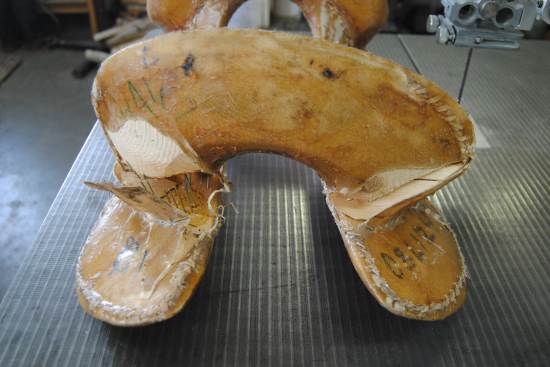
If the saddle tree is broken, walk away.
The tree is the internal frame of the saddle. It provides structure and distributes the rider’s weight across the horse’s back. A cracked or broken tree can:
- Create pressure points
- Cause back soreness
- Lead to long-term damage
- Make the saddle unsafe
How to Check a Saddle Tree
Step 1: Twist Test
Hold the pommel and cantle and gently twist in opposite directions.
You should feel resistance and stability.
If it flexes excessively or makes cracking sounds, that’s a red flag.
Step 2: Press Down Evenly
Press down firmly on the seat with both hands. It should feel solid, not springy or uneven.
Step 3: Visual Symmetry
Set the saddle on a flat surface and look at it from behind.
Is one side lower? Does it look uneven?
Even if the saddle is priced at $300, a broken tree makes it worthless.
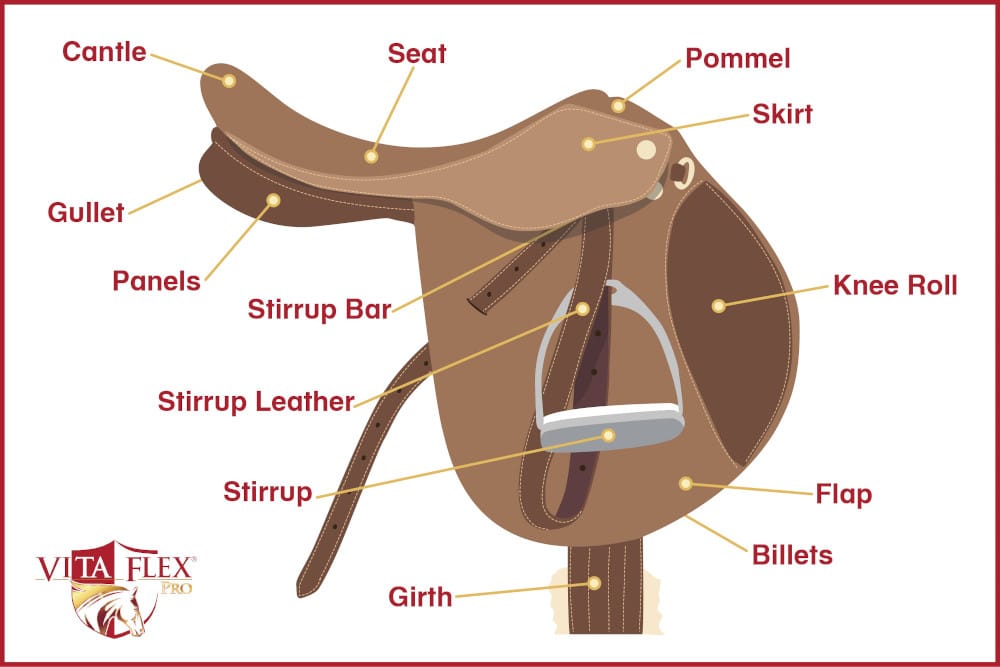
The basics of english saddle parts:
2. Inspect the Leather Condition
Leather tells a story.
Well-maintained leather will feel supple and slightly tacky — not brittle or flaky.
What to Look For
- Dry rot (cracking that goes deep into the leather)
- Stiff, brittle billets
- Mold or mildew
- Deep cracks at stress points
- Excessive stretching
Key Areas to Check Closely
- Billets (English saddles)
- Latigos (Western saddles)
- Stirrup leathers (though these can be replaced, but would be an additional cost)
- Fenders
- Seat seams
Surface scuffs are cosmetic.
Deep cracking near load-bearing areas is structural.
If you can bend a billet and see fibers splitting, it likely needs replacement.

3. Check Billets, Latigos & Rigging Hardware
Billets and rigging endure constant tension. They’re often the first components to wear out.
For English Saddles:
- Are billets evenly stretched?
- Is stitching intact?
- Is there cracking near the base?
- Are girth straps soft or brittle?

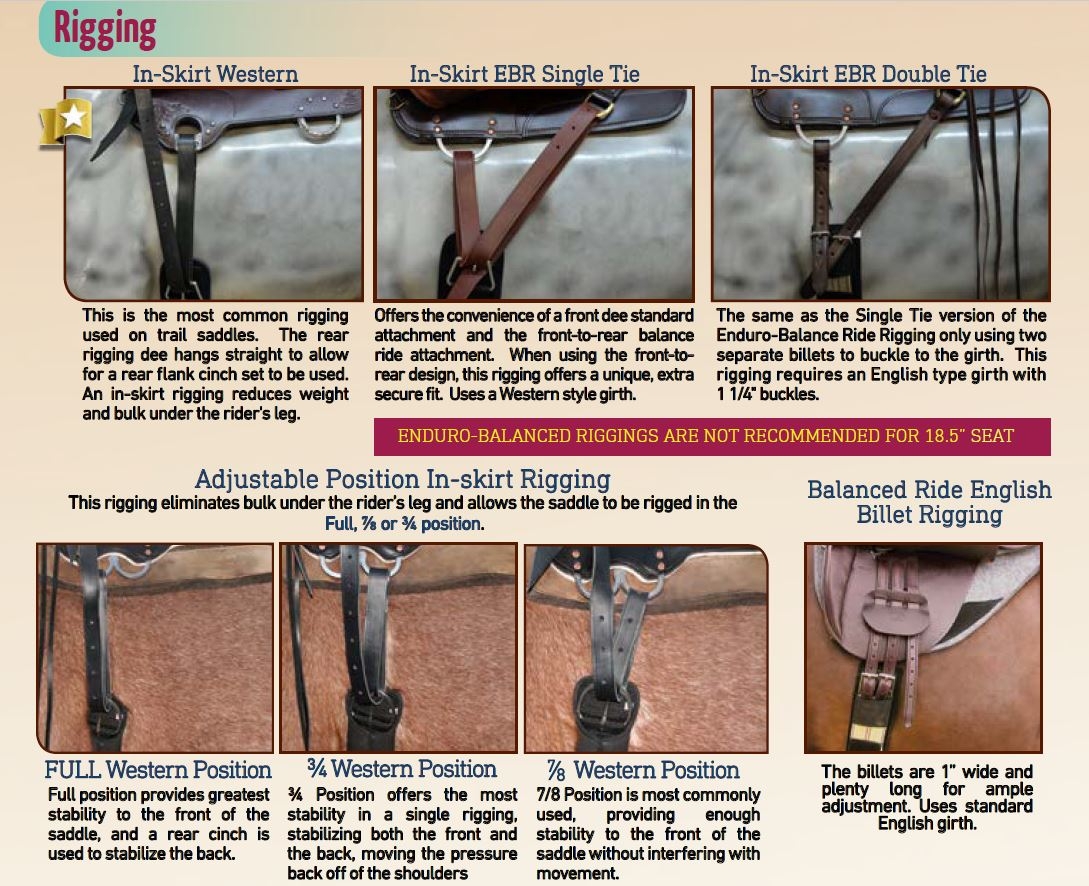
For Western Saddles:
- Check the latigo strap.
- Inspect D-rings and rigging hardware.
- Look for rust or loose screws.
- Make sure the rigging plate is secure.
Replacing billets typically costs $100–$300 depending on labor.
Factor repair costs into your offer price if the saddle requires any repairs.
4. Examine the Panels and Flocking (English Saddles)
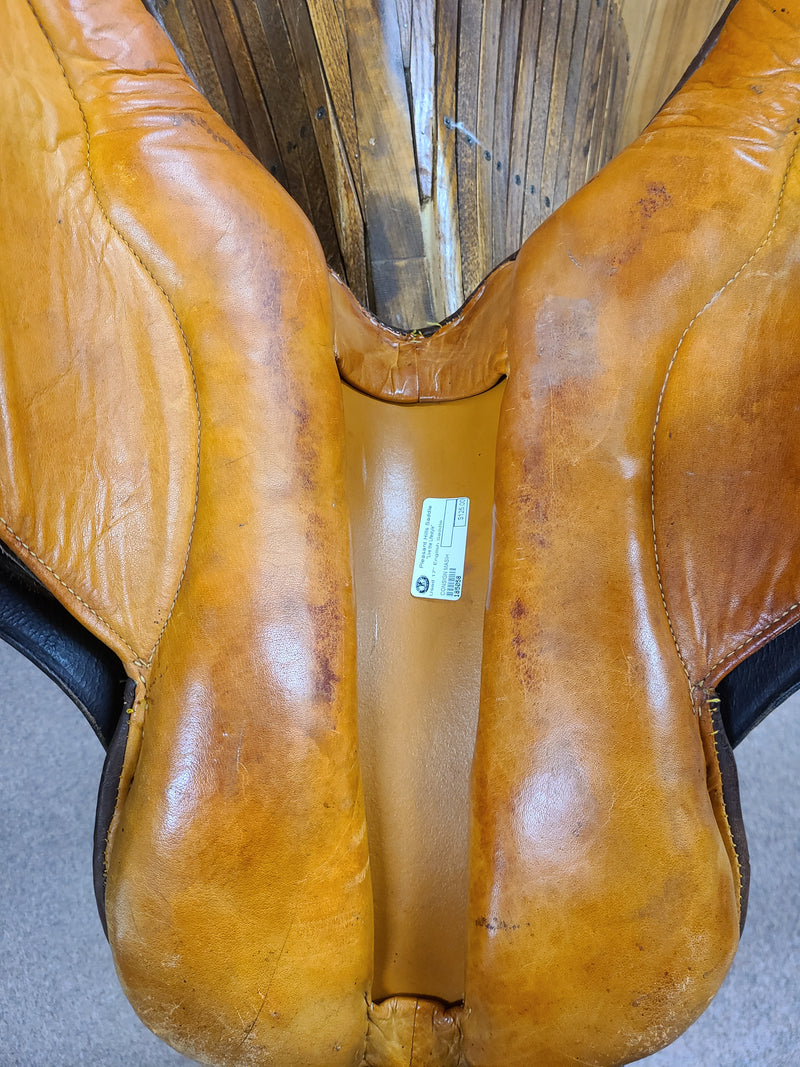
Flocking refers to the wool or synthetic material inside the panels that cushions the horse’s back.
Over time, flocking can become:
- Lumpy
- Hard
- Uneven
- Compressed
Run your hand along the underside panels.
They should feel smooth and even — not bumpy or hollow.
Reflocking is possible and often worth it, but it can cost $200–$400. If the saddle is priced accordingly, that may still be a good deal.
5. Inspect the Seat and Rider Comfort
A saddle that fits your horse but not you is still a poor investment.
Check Seat Size
Most English saddles range from 15” to 18”.
Western seats are typically measured differently (often 13” to 17”).
Sit in the saddle (on a rack or stand).
You should have:
- About a hand’s width behind you
- A balanced, centered feel
- No pinching at hips or thighs
If the twist (narrowest part of the seat) feels too wide or too narrow, long rides may become uncomfortable.
Comfort matters more than brand name.
6. Make Sure It Fits Your Horse

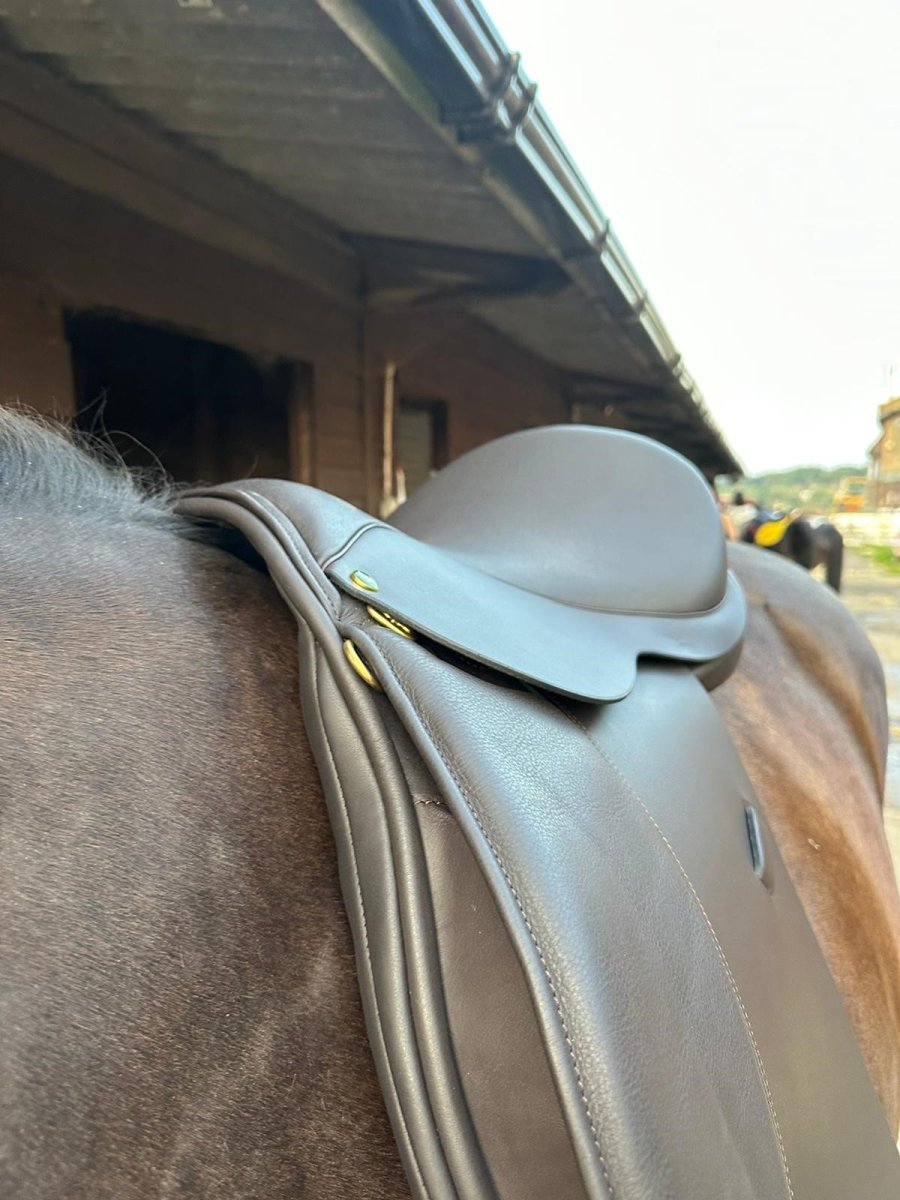
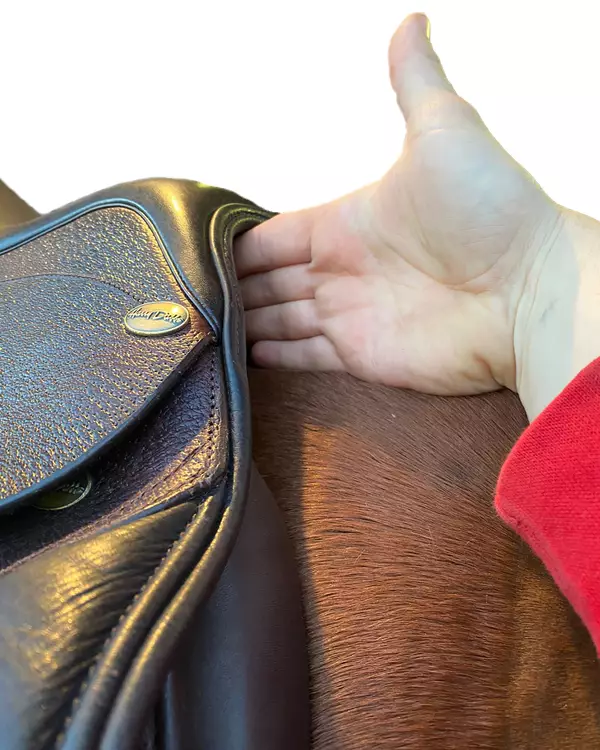
Even a structurally perfect saddle is useless if it doesn’t fit your horse.
Basic Fit Check (Without Pad)
Place the saddle directly on your horse’s back.
Look for:
1. Wither Clearance
You should be able to fit 2–3 fingers between the withers and pommel.
2. Even Contact
Panels should sit evenly along the back.
3. No Rocking
Press on the pommel and cantle. It shouldn’t teeter.
4. No Bridging
There shouldn’t be a gap in the middle when the front and back touch.
Whenever possible, ask for a trial period.
A 3–7 day trial can prevent a costly mistake.
Tools That Make Checking Saddle Fit Easier
You don’t need expensive equipment to evaluate saddle fit — but having a few simple tools makes the process far more accurate (and prevents costly guesswork).
These are inexpensive items I recommend keeping in your tack room, especially if you’re shopping used.
Flexible Measuring Tape
A soft measuring tape helps you:
- Measure seat size
- Check flap length
- Compare gullet width
- Record dimensions when shopping online
When buying used, measurements matter more than brand names. Sellers often guess — a measuring tape removes the guesswork.
Gullet Measuring Tool
If you’re comparing multiple saddles, a gullet gauge helps you see differences clearly — especially when sellers list sizes like “medium” or “wide” without specifics.
It’s especially helpful when:
- Buying from Facebook Marketplace
- Comparing two similar saddles
- Confirming fit before committing
👉 Helpful tool: Adjustable gullet measuring gauge
Wither Tracing Tool
A wither tracing tool (or flexible curve ruler) allows you to trace your horse’s back shape and compare it to the saddle.
This is one of the easiest ways to:
- Avoid buying a saddle that’s too narrow
- Identify potential pressure points
- Compare multiple saddles before purchase
You can bring the tracing with you when shopping.
👉 Helpful tool: Flexible curve ruler for wither tracing
Saddle Fit Notebook
When viewing multiple saddles, details blur together quickly.
Keep notes on:
- Brand & model
- Tree width
- Seat size
- Fit observations
- Needed repairs
A simple notebook can prevent you from forgetting key details and overpaying later.
👉 Helpful tool: Small durable notebook for saddle inspection notes
If you’re unsure about fit, hire a qualified local saddle fitter — ideally one who works with multiple brands rather than selling just one line. Yes, it will add to your upfront cost when buying a used saddle. But a professional fitting can prevent back soreness, behavioral issues, and expensive resale mistakes. In most cases, the cost of a saddle fitter is far less than the cost of buying the wrong saddle.
7. Research the Brand and Model
Some brands hold value better than others.
Well-known brands often:
- Have better resale value
- Offer replacement parts
- Maintain structural integrity longer
Search the brand and model online.
Check:
- Original retail price
- Known tree type
- Common fit issues
- Reviews from other riders
- Search used listings to see if your price is reasonable
If the seller can’t tell you the brand, that’s a red flag.
8. Ask the Seller These Questions
Before handing over cash, ask:
- Why are you selling?
- Has it ever been repaired?
- Has it been reflocked?
- Has the tree ever been replaced?
- How was it stored?
- How long have you owned it?
A knowledgeable seller usually indicates a well-cared-for saddle.
9. When a Used Saddle Is Actually a Bad Deal
Avoid buying a used saddle if:
- The tree is questionable
- Leather is severely cracked
- Panels are asymmetrical
- Billets are dangerously thin
- Repairs exceed saddle value
- The saddle doesn’t fit your horse
Sometimes the best financial decision is walking away.
10. How to Negotiate a Fair Price
Do your homework.
Search comparable listings online.
Factor in:
- Needed repairs
- Stirrups and stirrup leathers if they are not included
- Professional fit adjustments
Bring agreed upon money as cash or money order however you agreed to pay.
Be polite, but don’t be afraid to counteroffer.
A fair offer backed by clear inspection points is usually respected.
Protect Your Investment: Proper Saddle Storage Matters
Once you’ve found the right used saddle, the next step is protecting it.
Even a high-quality saddle can deteriorate quickly if it’s stored improperly. Humidity, poor airflow, and improper support can warp leather, weaken stitching, and shorten the life of your investment.
A few simple storage upgrades can dramatically extend the life of your saddle.
Saddle Covers
A breathable saddle cover protects against:
- Dust buildup
- Sun exposure
- Accidental scratches
- Barn debris
If you’re storing your saddle in a shared tack room, a cover is one of the easiest ways to keep it clean and protected between rides.
👉 Helpful option: A fleece-lined, breathable english saddle cover designed for daily use.
👉 Helpful option: A fleece-lined, breathable western saddle cover designed for daily use.
Wall-Mounted Saddle Racks
Improper support can cause long-term shape distortion.
A sturdy wall-mounted saddle rack:
- Supports the tree properly
- Prevents tipping
- Keeps leather from creasing
If your saddle is balanced correctly while stored, it maintains its structure longer.
👉 Recommended: A heavy-duty wall-mounted saddle rack for long-term tack room storage.
Portable Saddle Stands
If you travel to shows or clinics, portable saddle stands prevent your saddle from sitting on:
- Fences
- Trailer rails
- The ground
Improper resting surfaces can stress the tree and crease leather over time.
👉 Useful option: Foldable portable saddle stand for travel and barn use.
Control Tack Room Humidity
Moisture is one of the biggest threats to leather.
Excess humidity can cause:
- Mold growth
- Mildew
- Stitching breakdown
- Premature leather deterioration
If your tack room runs damp — especially in winter — a small dehumidifier can protect not just your saddle, but all of your tack.
👉 Helpful addition: Compact tack-room dehumidifier for leather protection.
Smart Spending Isn’t Just About Buying — It’s About Maintaining
You worked hard to find a quality used saddle.
Proper storage is what keeps that saddle from becoming another resale listing six months from now.
Protecting your investment is part of being an economical equestrian.
11. Final Used Saddle Inspection Checklist
Before you buy, confirm:
☐ Tree feels solid
☐ Leather is supple
☐ Billets/latigos are strong
☐ Panels are even
☐ Saddle fits your horse
☐ Saddle fits you
☐ Brand and model verified
If you can check all of those boxes, you’re likely making a smart purchase.
Before You Ride in a Used Saddle…
Before you ever swing a leg over a used saddle, take the time to fully clean and inspect it. Even if it looks fine, you have no idea how it was stored, how often it was cleaned, or what kind of stress it’s been under.
A quick refresh isn’t just about appearance — it’s about safety and longevity. Clean It Thoroughly
Start with a quality saddle soap and remove dirt, sweat buildup, and old grime. Pay special attention to:
- Under the flaps
- Around stitching
- Billets and stirrup bars
- The underside panels
Dirt hides cracks. Cleaning reveals the truth.
👉 Recommended: A gentle saddle soap that cleans without over-drying the leather.
Condition the Leather
Once clean and fully dry, apply a leather balm or conditioner to restore flexibility and prevent cracking. Used saddles often sit in tack rooms for months before being sold, which can dry out the leather more than you realize.
Focus on:
- Billets
- Seat edges
- Fenders or stirrup leathers
- Any area that bends under pressure
A good conditioner can bring life back to leather — but it won’t fix structural damage. If cracks deepen after conditioning, that’s a red flag.
👉 Helpful tool: A high-quality leather balm or conditioner designed for equestrian tack.
Inspect the Stitching Again
After cleaning and conditioning, inspect every seam carefully. Sometimes cleaning exposes weak stitching that wasn’t visible before.
Check:
- Billet stitching
- Seat seams
- Panel edges
- Rigging attachments
If threads look loose, frayed, or stretched, budget for repairs before riding.
Buying Used Is About Knowledge, Not Luck
The used saddle market can be a goldmine for budget-minded riders.
A high-quality saddle that’s been properly cared for can last decades.
But a poorly inspected saddle can cause:
- Horse discomfort
- Rider imbalance
- Expensive repairs
- Resale loss
Take your time. Inspect carefully. Ask questions.
Spending a little more on a solid, well-fitting saddle is almost always cheaper in the long run than buying a bargain that becomes a headache.
And when you know exactly what to look for, buying used becomes one of the smartest financial moves you can make as a horse owner.
Leave a Reply